Field Setup RGB
Apps to pre-install on your phones before heading to the site:
- Starlink app (Play Store / App Store)
- Veezoompro app (Play Store / App Store)
You may also want to bring a Windows laptop with Microsoft Edge (that can switch to Internet Explorer mode) to access the BARLUS camera settings on the browser.
Hardware List
Below is a list of hardware components that are used to set up an edge computing system. We have partnered with OceanAID and Whooshh Innovations to build field-ready hardware systems. If you are interested in building your own, the components list is a useful resource.
| Component | Qty | Price |
|---|---|---|
| Barlus E3G5MPCX10 cameras | 4 | $480/ea |
| Starlink system | 2 | $599/ea + $110/mo |
| Ethernet to wifi adapter for Starlink | 1 | — |
| Raspberry Pi 2GB ExtremeKit | 2 | $154.95/ea |
| Jetson Nano | 4 | $149/ea |
| Power Barrel Jacks 5V 10W | — | — |
| LaCie Rugged Mini 5TB external HDD (USB 3.0) | 4 | $169.99/ea |
| Micro B to USB 3.0 cables | — | — |
| IP home security camera | 2 | $65.99/ea |
| POE injector adapter | 2 | $18.98/ea |
| Network switch w/8 ports | 4 | $26.99/ea |
| LED submersible light bars | 8 | $161.99/ea |
| Heavy Duty LED Light Strips (Boogey Lights) | 8 | $24.99/ea |
| Power Lead Extension Kit (Boogey Lights) | 8 | $5.49/ea |
We also recommend having spare SD cards or using a SSD rather than SD, since SD cards can degrade quickly during continuous field deployments, resulting in system slowdowns or complete failure.
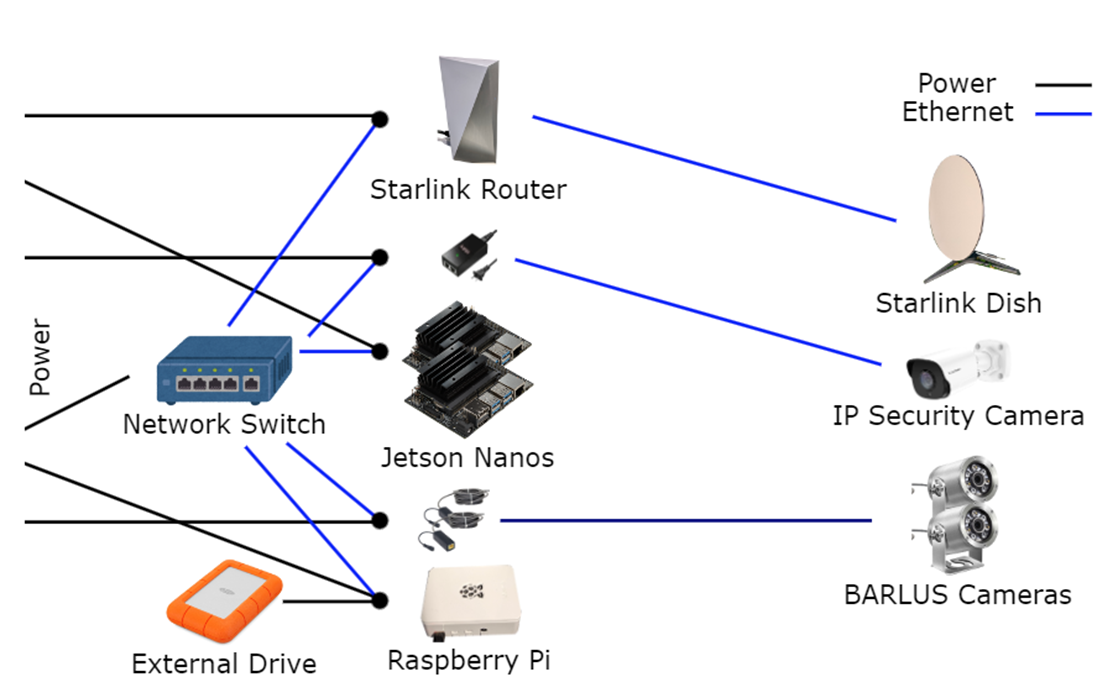
Components Requiring External Power
- Raspberry Pi
- Jetson Nanos
- Starlink dish
- BARLUS cameras
- IP security camera — through a Power-over-Ethernet (POE) injector adapter
- Network switch
Additional Components for OceanAID Edge-Computing Devices
- A small portable screen, preferably powered by 12V or DC (example)
- Keyboard
- Mouse
- Extra Ethernet cables
- Extra switch splitter
- Personal laptop
Setup for a SalmonVision System
New systems include a second Raspberry Pi — one for each camera to spread the load of motion detection per camera.
Starlink Dish
- Download the Starlink app before arriving on site
- Follow the visual instructions on the app to set up the Starlink dish
- You can check for obstructions in the Starlink app, but previous knowledge suggests that the Northern direction should be the most clear from obstructions whereas the south can have more obstructions
- Ideal distances: North 75m, East/West 45m, South 15m (see Starlink obstructions reference below)
- It may be possible to get decent connectivity without those specific distances, although network drops may happen more frequently with more obstructions
- Ideally, create a strong password for the WiFi with multiple random words and save it in a password manager (e.g.
proveTOGETHERuntil)
- Go into the Starlink App while connected to the WiFi → Settings → note the Sleep Schedule option
- This may be a better alternative to shutting down the Starlink, since it allows the router to continue to provide WiFi in the Local Area Network (LAN)
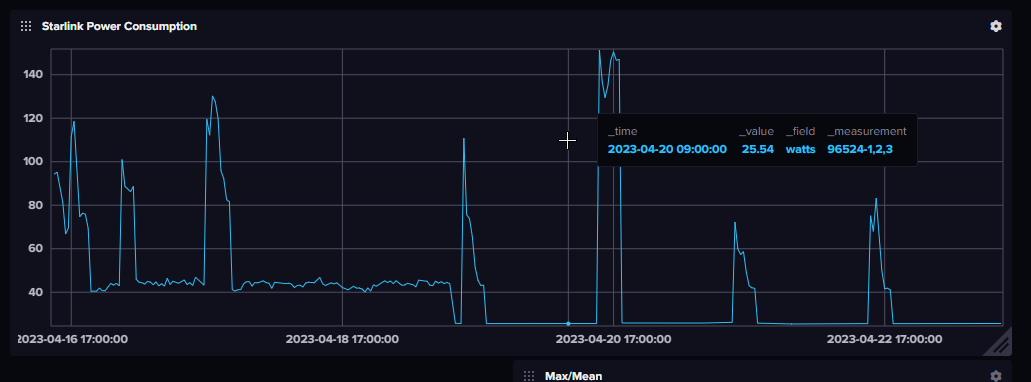
- Sleep mode uses 25–26 watts — slightly more than half as much power as an idling Starlink (~50 watts)
- Connect the Starlink Ethernet Plugin to the router
- Connect the network switch to power
- Connect an ethernet cable from the Starlink router to the network switch
- Connect the BARLUS camera to the network switch through an ethernet cable
- Connect the BARLUS camera to power
- Connect a laptop to the Starlink WiFi
- Open up a browser and navigate to the camera IP address to preview the video feed
- While previewing the camera feed, place BARLUS cameras one at a time in the salmon trap, keeping the camera upright
Microcontrollers
- Connect the Raspberry Pis to the network switch through an ethernet cable
- Connect the rugged hard drive to the first Raspberry Pi’s blue USB ports
- For OceanAID’s Marlin Box, make sure the cable is tightly screwed in and not cross-threaded; the cable may work better in one orientation as opposed to the other (a technician can remote in to check if the speed matches)
- It might be best to use the direct USB-A port if the Marlin Box is fully contained within a waterproof casing
- Connect the Raspberry Pis to power
- You can tell it is running if the Raspberry Pi’s fans are on or the metal parts are warm, and you can feel the hard drive rumbling slightly
- When swapping hard drives, please unplug the USB-A port connected to the Raspberry Pi, not the one connected to the hard drive
- Connect the two Jetson Nanos (e.g. jetson quay hi, jetson quay fu) to the network switch through an ethernet cable each
- Connect the two Jetson Nanos to power
- The devices for one river must be in the same place (e.g. pi quay hi, jetson quay hi, jetson quay fu)
- Once the devices are set up, turn off your phone’s WiFi for a minute to allow the cameras and microcontrollers to get their static IPs before reconnecting
Important: When testing the software, please wait around 10–15 minutes before turning off the Raspberry Pi or unplugging the hard drive as it may need some time to write the motion detected clips to the disk — otherwise it may get corrupted.
Logfiles are written to an internal folder in
/media/local_hdd, but will be copied to the external hard drive every 2 hours.
Starlink Obstructions Reference
This is the most ideal setup, but it likely won’t be possible. Starlink will still work with some obstructions — outages will just become more frequent with more obstructions.
| Direction | Clear Distance |
|---|---|
| North | 30m × 2.5 = 75m |
| East/West | 30m × 1.5 = 45m |
| South | 30m × 0.5 = 15m |

Starlink Power Consumption
Sleep mode uses 25–26 watts which is slightly more than half as much power as an idling Starlink dish (~50 watts). The spikes describe points where the Starlink is out of sleep mode — likely it needs to warm up and search for satellites, but it will probably connect faster than starting up from shutdown.
BARLUS Camera Connection with Windows PC
- Connect your Windows laptop to the Starlink WiFi
- Open up a browser (the old cameras only work with Internet Explorer or Edge)
- Navigate to the camera IP address:
- First camera: 192.168.1.120
- Second camera: 192.168.1.121
- You should see a username and password login page
- (OLD BARLUS) Look at the top right for an Internet Explorer symbol and click on it
- (OLD BARLUS) You may need to install ActiveX from the site and refresh the page
- Use the default credentials:
- Username:
admin - Password:
admin123456
- Username:
Turn Off Lighting
- Click on the Lighting button one at a time until the display says “Manual” and “W: OFF”
- Go to Preset, enter the number 250 and press Call to save the configuration
Turn On Lighting
- To have lights turn on automatically: go to Presets → click on Preset 152 → click Call
- To turn on lights manually: click on the lightbulb button
BARLUS Camera IPs
| Camera | IP Address |
|---|---|
| Camera 1 | 192.168.1.120 |
| Camera 2 | 192.168.1.121 |
The easiest way to check the cameras (for newer BARLUS cameras) is to connect your phone or laptop to the Starlink and enter the IP address in your web browser. The IP address for each Barlus camera is printed on a sticker on the side of the camera.
Default credentials for newer cameras:
- User:
admin - Pass:
admin1234567
Access through RTSP using VLC or any other video player:
rtsp://<ip>:554/av0_0rtsp://<ip>/0