Label Review Interface
There are two ways to start the label review process:
- Label All Tasks — Click on the blue Label All Tasks button and you will go through the tasks assigned to you one at a time. Click Submit to proceed and save, and Skip to not review it.
- Individual video — Hover your mouse over the video (row) you like to review which will light up blue. Click and it will bring you to the same review window as option 1. NOTE: clicking on the blue “play” button will only show a thumbnail preview of the video.
The Seven Panels
The label review interface has seven sections (when started through clicking an individual video). We will briefly discuss each and dive deeper into the reviewing process.
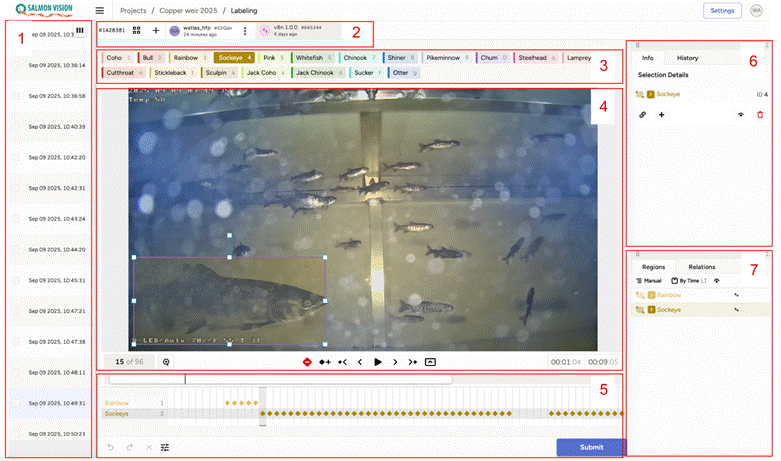
| Panel | Name | Description |
|---|---|---|
| 1 | Files | The individual videos with the current video highlighted in light blue |
| 2 | Users | The different users working on the project |
| 3 | Class overview | Overview of all the classes |
| 4 | Viewer | The review panel with controls |
| 5 | Timeline | The tracks panels, showing in which frame each unique detection is visible |
| 6 | Details | Shows details of selected detection (e.g. detection 2 of class Sockeye) |
| 7 | Annotations | Overview of the annotations |
Panel 3 — Class Overview
In the Class overview panel you see all the different classes which can be detected within a given project.
When you have selected a specific detection (e.g. a fish) a set of data subclasses will become visible below the species labels bar, and available to be included in your annotations. For example, the reviewer can:
- Select the sex of the fish (once this selection is made, you can no longer unselect a sex for the individual without deleting the annotation — sex should only be determined if the reviewer is very confident in their assessment)
- Indicate whether the fish is adipose clipped using the “clipped” subclass
- Indicate whether they have a visually identifiable tag (e.g. a FLOY tag) using the “tagged” subclass
- Note whether the fish has visible net scarring, is diseased or visibly injured (e.g. an open wound)
If these subclasses are not useful to your team, using them is not required. Subclasses can be added relatively easily to the UI — feel free to inquire with the Salmon Vision team if your project needs additional categories.

Panel 4 — Viewer
The Viewer panel is where you can view the video and the annotations. The counter in the left bottom (e.g. 15 of 96) indicates which frame is selected out of the total number of frames. In the right bottom the play time (e.g. 00:01:04) relative to the total length of the file (e.g. 00:09:05) is depicted. The format is mm:ss:dsds.
Playback Controls
| Symbol | Name | Action |
|---|---|---|
| ➕ | Toggle keypoint | Creates or deletes a keypoint (see below for explanation) |
| 🔗 | Toggle interpolation | Starts or stops interpolation between a selected frame and the preceding sequence |
| ▶️ / ⏸️ | Play / Pause | Play or pause the video |
| ◀ / ▶ | Move one frame | One step back or forward |
| ⏮ / ⏭ | Move to keyframe | Go to previous or next keyframe |
| 📊 | Toggle timeline | Expands or collapses the timelines |
When Pressing Shift
| Symbol | Name | Action |
|---|---|---|
| ⏮ / ⏭ | Go to first / last frame | Goes to the first or last frame of the entire video sequence |
| ⏪ / ⏩ | Hop backwards / forwards | Moves 10 frames backward or forwards |
Keypoints
A keypoint in a video is an annotation of a specific object in a frame, represented by a diamond shape on the timeline panel. In the example above, frame 15 contains a keypoint of the Sockeye detection. A frame can have keypoints for different detections if they occur simultaneously.
When a video has been prelabelled by a detection model, each frame of the detection sequence is also a keyframe. When manually labelling, the reviewer has to manually draw a box, or when interpolation is on, reposition and/or adjust box size.
Best practice: Have at least one keypoint every 10 frames for a stationary fish and, depending on the speed and change of direction of movement, every 1–5 frames for faster or more erratic movements.
Panel 5 — Timeline
The Timeline panel provides an overview of each detection (rows) and where in the sequence of the video (frame) it was detected. The detections are numbered chronologically and have the name and colour of the assigned class (see Panel 3).
When prelabelled by the detection model, each frame in which a specific individual was detected is a keyframe (continuous sequences of keypoints). Note that if a fish disappears out of sight (e.g. from frame 51–55), it is important that frames with no fish are left empty and keypoints restarted when the same individual reappears.
Manual Annotation
To manually annotate, the user can draw a bounding box with the mouse cursor capturing the fish on the first frame it appears:
- If no class is selected, the bounding box will have the “blank” label which is used for fish of unknown identity
- If the species is known, the right class can be selected before drawing the box (most efficient) or the “blank” can be changed after selecting the correct species class
When advancing frames for individual detections, click on Toggle keypoint (+) to create new keypoints.
Interpolation
When interpolation is on, the keypoints are automatically connected, but new keypoints are only produced when the bounding box is moved or reshaped. Label Studio uses linear interpolation to move the position of the bounding box in the intermediate frames.
It is important to find the last frame in the sequence in which the individual is visible and switch off the interpolation (Toggle interpolation button). If the individual reappears, make a new keypoint and switch interpolation back on.
The timeline panel also includes access to the settings in the left bottom and provides a Submit option (right bottom) which will save all the changes you have made.
Remember: You have to submit changes to save them.
Post-Submission Verification
After having submitted the video, it is important to use the scroll bar on the bottom of Panel 1, and confirm that the correct value appears under the column(s). For example, if 3 sockeye swam through the box and the AI was accurate in detecting them, once submitted, scroll to the right and confirm that 3 sockeye appear under the column “sockeye”.
Panel 6 — Details
The Details panel provides information on the selected detection:
- Info tab — Provides information regarding the type of label (a bounding box in this case), the class type and where it is in the order of appearance (e.g. Sockeye and 2)
- Plus symbol (+) — Allows the user to enter additional metadata associated with the detection
- Eye icon (👁️) — Toggles between switching the bounding box on/off (very handy when there are many detections)
- Red garbage bin (🗑️) — Deletes the annotation
Panel 7 — Annotations
The Annotations panel provides an overview of all of the detections made in the file in order of appearance (default is Manual). The sequence is the same as in the Timeline panel (Panel 5).
The order can be changed by clicking Manually and selecting Group by Tool or Label. Note that bounding boxes drawn by the reviewer will appear at the bottom of the annotations panel, regardless of where they appear in the video.
Tip: When deleting multiple annotations, hold Ctrl and click on several annotations to select multiple, then scroll to the trashcan in Panel 6 and delete them.
To the right the user can sort By time (default) or Order by Score (if available). The eye symbol allows for switching to hide/make visible all the annotations — very useful if you want to focus on one annotation among many. The Relations tab can be ignored for now.
Important: Labeling vs. Reviewing
There are two main types of data annotation work which we term labeling and reviewing.
Labeling
Labeling involves removing AI-generated bounding boxes and drawing your own bounding box, making sure the boxes are of the correct class, starts when the object first appears and ends when it leaves the frame, and the bounding box is tightly fitted around the object. This typically involves manual adjustments for bounding box size at keypoints throughout the observation of a fish. This is high quality data that will be used as new training data.
Reviewing
Reviewing is a much faster process where class assignment is checked and the bounding box should loosely follow and fit the object. The goal of a review is to produce a correct count, with less emphasis on the precise location and size of bounding boxes. If an AI annotation is far off there are several options:
- Adjust the existing bounding box to fit better
- Delete the bounding box if it is way off and redraw it
- Delete erroneous extra bounding boxes or draw around fish which have been missed
The difference between labelled and reviewed data is not clear-cut necessarily (i.e. AI-generated data in a reviewing session can be of “labeled” grade). It is important to remember that when starting a labeling session it is of utmost importance to be very precise.